Thermal imaging cameras have revolutionised wildlife observation, allowing us to see the unseen in nature. Whether you’re a hunter, a wildlife enthusiast, or a photographer in the UK, a thermal imaging camera for wildlife (not to be confused with thermal scopes) can elevate your outdoor experiences. These devices detect heat instead of light, so they work day or night, piercing through darkness, fog, and even camouflage to reveal animals that would otherwise remain hidden.
In this comprehensive guide, we’ll explain what thermal imaging cameras are, how they work, and why they’re so beneficial for wildlife observation. We’ll explore use cases like night-time spotting, tracking, and conservation, and provide a comparison of top thermal spotters (handheld thermal monoculars) on the market. By the end, you’ll understand how to choose the right thermal imager for your needs – all with a focus on UK wildlife and conditions.
What is a Thermal Imaging Camera and How Does It Work?
A thermal imaging camera (often called a thermal spotter or thermal monocular when handheld) is a device that uses infrared sensors to detect heat (infrared radiation) emitted by objects, animals, or people. Every living thing gives off heat, and thermal cameras convert these heat signatures into a visual image, usually with different colours or shades indicating temperature differences.
Unlike traditional night vision that amplifies ambient light, thermal devices do not require any light at all – they rely solely on heat. This means you can get a clear picture in complete darkness as well as in daylight, since the technology is based on temperature contrast, not visible light.
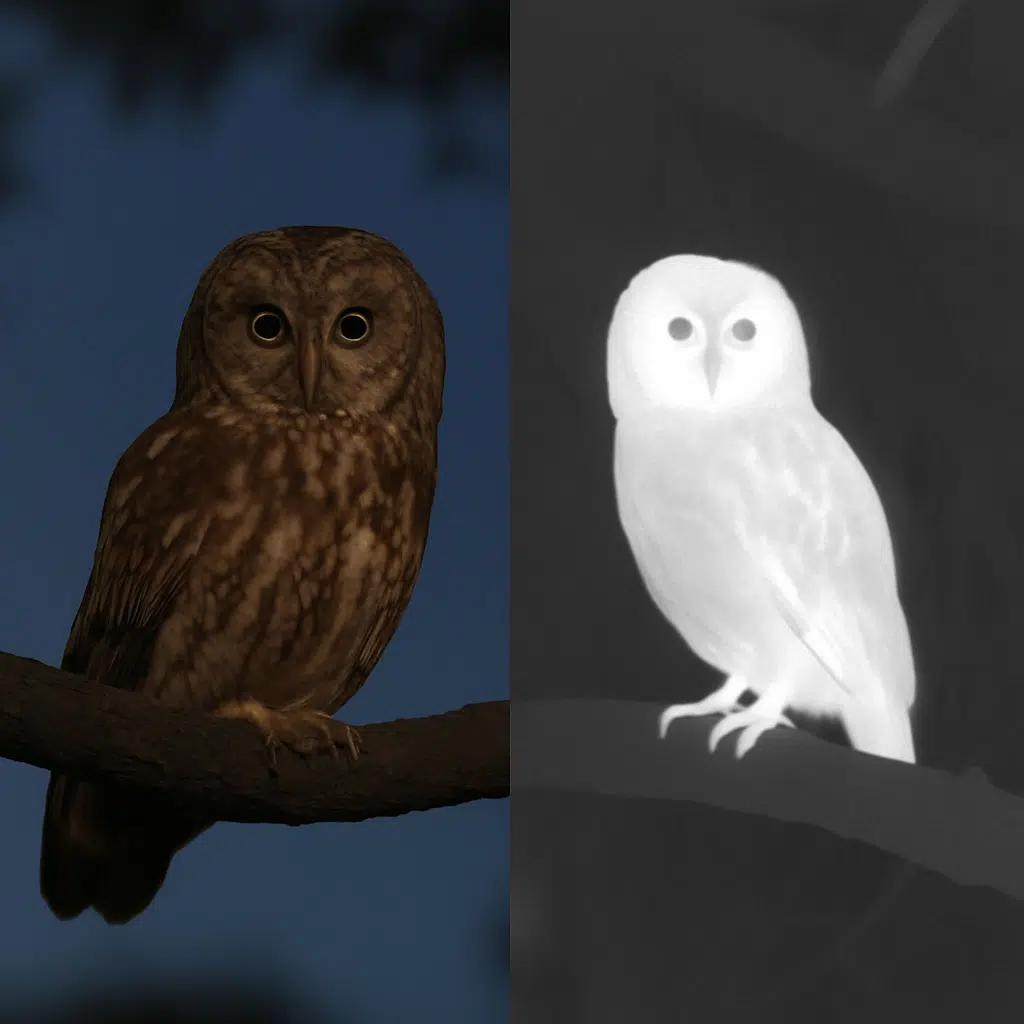
In practical terms, when you look through a thermal imaging camera, warm objects (like a deer or a person) will appear bright (often white or glowing in “white hot” mode) against cooler backgrounds which appear darker. Many thermal cameras offer multiple colour palettes – for example, white hot, black hot, red hot, etc. – but all serve the same purpose of highlighting differences in heat.
Because of this heat-based vision, thermal cameras can even penetrate some obscurants like light fog or smoke and aren’t fooled by an animal’s camouflage. They “see” the heat of an animal through bushes or trees (not through solid objects, but if an animal is behind light cover or in shadows, its heat may still be visible). Essentially, a thermal imaging camera gives you a superpower: the ability to detect the warm-blooded creatures around you regardless of lighting or backdrop.
Key components of a thermal imaging camera include the thermal sensor (microbolometer) which picks up infrared radiation, the objective lens (often made of special materials like germanium since regular glass blocks infrared), and a display where the thermal image is shown to the user. Modern handheld thermal spotters often also include features like digital zoom, video/photo recording, Wi-Fi streaming, and rechargeable batteries.
Why Use a Thermal Imaging Camera for Wildlife Observation?
Thermal imagers have quickly become invaluable tools for wildlife monitoring and research. Here are some of the major benefits of using a thermal imaging camera for wildlife in the UK:
- See Nocturnal Wildlife: Many animals in the UK are nocturnal or crepuscular (active at dawn/dusk) – think of foxes, badgers, hedgehogs, or bats. Observing them with regular optics at night can be nearly impossible. Thermal cameras excel at revealing nocturnal creatures because they don’t need light at all. A hedgehog rustling in the hedgerow or a barn owl perched in a dark tree will light up in your thermal viewer, appearing as a bright silhouette against cooler backgrounds. Even tiny bats can be detected by their warmth when they emerge at night. For anyone who enjoys UK wildlife spotting on evening walks or on late-night camping trips, thermal imagers unveil an entirely new world of nocturnal activity.
- Spot Hidden or Camouflaged Animals: British wildlife has mastered camouflage – a roe deer in the dappled woodland or a hare flattening against a field can vanish from sight. Thermal cameras cut through this by detecting the animal’s heat signature, clearly delineating it from the cooler environment. Even if an animal is obscured by dense vegetation or shadow, if there’s a direct line of sight (no solid barrier), its warmth will betray its presence. This makes thermal imaging superb for finding elusive creatures that blend into their habitat. For example, a well-camouflaged bird on a nest or a wildcat hiding in the underbrush could be located via thermal imaging when you’d likely miss it with the naked eye. Thermal technology essentially beats camouflage, giving you a truer picture of what’s in your environment.
- All-Weather, Day or Night Operation: The UK’s often grey, misty weather can hamper regular visibility. Thermal devices, however, often maintain performance in conditions like light fog, mist, or rain (within reason). Because they detect heat, they aren’t as affected by whether it’s sunny or pitch black – you can use them equally well in daytime as at night. On a foggy morning in the Scottish Highlands, you might still pick out the warm shape of a stag through a thermal monocular where a regular binocular sees only haze. In total darkness or glaring sunlight, the thermal will provide a consistent heat-based image. Do note, though, heavy rain or downpour can reduce thermal visibility somewhat (rain on the lens or extreme temperature uniformity can be factors), but generally, they are reliable even in adverse weather.
- Non-Invasive Observation: A huge benefit for wildlife enthusiasts and conservationists is that thermal imaging allows you to observe animals without disturbing them. There’s no need for bright spotlights or intrusive approaches – you can watch from a distance in stealth. Animals usually cannot detect thermal cameras since they emit no visible light and minimal noise. This means natural behaviours can be recorded undisturbed. For instance, a researcher can monitor an otter by a river at night or check a badger sett from afar without alerting the animals. This non-intrusive aspect minimises stress on wildlife and is great for ethical observation and photography, as well as for scientific study where you want animals behaving naturally.
- Tracking and Conservation: Thermal cameras are now used in conservation to track endangered species and support anti-poaching efforts. In wildlife reserves, rangers use thermal imagers to scan large areas for the heat signatures of animals (or potential poachers). In the UK context, conservationists might use thermal drones or handheld units to count populations of deer at night, locate reintroduced species (like pine martens or wildcats in conservation projects), or even help find injured wildlife in rescue operations. The ability to detect a hidden animal also means you can monitor dens or nests from a distance. For example, by observing a fox den with a thermal camera, you can see if cubs are warm inside or when the vixen returns, all without approaching the den entrance.
- Safety and Search & Rescue: While our focus is wildlife, it’s worth noting that the same thermal technology can find lost pets or even people in wilderness settings. If you’re out in the countryside and someone wanders off trail, a thermal imager can be a lifesaver for quickly scanning the area for a human heat signature. Many search-and-rescue teams use thermal optics for this reason. Likewise, farmers might use thermal cameras to check fields for wildlife (like deer fawns) before mowing, to avoid harming them.
In summary, a thermal imaging camera for wildlife gives you unprecedented awareness of your surroundings. It lets you observe animal behaviour that usually happens in darkness or behind nature’s curtain. From a UK perspective, this might mean spotting a family of red deer moving through a midnight mist on the moors, watching a hedgehog shuffle through your garden hedges at 2 AM, or tracking a fox across a starlit field with ease. It’s a game-changer for anyone passionate about nature.
Key Applications of Thermal Imaging in Wildlife
Thermal imaging technology is versatile. Here are some of the most common use cases and user groups who benefit from it:
Night-Time Wildlife Spotting & Bird Watching
For wildlife enthusiasts, hikers, and bird watchers, a thermal camera opens up nocturnal wildlife observation. You can scan a field or forest at night and detect animals without any lights. This is fantastic for spotting deer grazing after dusk, foxes on the prowl, owls roosting in trees, or even colonies of bats leaving their roost. Birders might use a thermal imager in early morning to find where birds are perched (their warmed bodies show up) before switching to binoculars.
Because thermal is silent and covert, it’s ideal for nature lovers who want to quietly observe animals that would flee if you lit them up with a torch. In the UK, organisations and citizen scientists also use thermal cameras for things like counting bats or observing garden wildlife at night (for example, to see if hedgehogs are visiting a feeding station after dark). It’s an eye-opening tool for anyone curious about the secret night life of local fauna.
Hunting and Game Management
Hunters and professional wildlife managers increasingly rely on thermal optics for ethical and effective tracking of game. In the UK, where night-time hunting is tightly regulated (e.g. pest control for rabbits or fox control on farms), a thermal monocular helps identify quarry quickly and safely.
Stalking deer at dawn or dusk becomes easier when you can pick out a stag’s heat signature through the trees before it ever steps into a clearing. Thermal spotters are used to locate animals and observe their movements; a hunter might then switch to a thermal rifle scope or close in carefully. The big advantage is you can spot animals in cover or low light that you’d otherwise miss, helping with a more humane and successful hunt by ensuring you know exactly where the animal is before taking a shot.
Additionally, gamekeepers can use thermal cameras to count wildlife populations (e.g., counting how many boar or deer are on an estate) or to find injured animals. Because thermal devices work in all seasons, they’re just as useful on a winter night as a summer evening.
Important: While using thermal imaging for spotting game is legal and common, UK hunters must always follow local regulations – for example, using any night vision or thermal for shooting certain species may require specific permissions. Always check the law if you intend to use thermal devices in hunting scenarios (as noted on the SWATCOM site, no licence is needed to own a thermal imager, but certain uses like hunting may have rules).
Wildlife Photography and Filmmaking
For photographers and filmmakers, thermal imagers offer both a scouting tool and a creative device in their own right. Many wildlife photographers will use a handheld thermal camera to locate animals in the dark or dense foliage, then set up their DSLR or telephoto lens to capture the animal once they know where it is. It’s much easier to photograph an elusive pine marten or an owl when you have first pinpointed it with thermal and can then slowly approach with your standard camera. This saves time and increases success rates for capturing rare wildlife shots.
Thermal cameras can also record video or still images themselves (some have built-in recording). While thermal footage looks different from normal video, it can be quite striking – for instance, filming a deer in thermal can produce a ghostly white figure moving through a black forest background, which can be used for documentaries or artistic effect. Photographers sometimes share thermal images of animals as unique content (e.g., a thermal image of a bird to show how it radiates heat). The key is that thermal imaging lets creatives see and record wildlife in situations where normal cameras would struggle (pitch dark, obscured, etc.), adding an extra dimension to storytelling.
Conservation, Research and Monitoring
As touched on earlier, conservationists and researchers gain a lot from thermal imaging. In Britain, this might include monitoring nest sites without disturbance, studying animal behaviour at night, or tracking reintroduced species. For example, if trying to determine how often an otter uses a holt (den) along a river, setting up a thermal camera at a distance for a few nights could reveal its pattern of coming and going by detecting the heat when it’s near the entrance.
Bird of prey researchers might use a thermal scope to check if chicks in a nest are warm (indicating they’re alive and being brooded) from a safe distance, rather than climbing and disturbing the nest.
Thermal drones (not the main focus here, but worth a mention) have also been used in UK to survey large areas for wildlife – for instance, spotting seal pups against a cold beach or locating nesting birds in agricultural fields before harvest. In forestry and farming, people use thermal imagers to detect animals like deer fawns or hare leverets hiding in fields, to avoid harming them during mechanical operations.
Finally, thermal cameras help in human-wildlife conflict management – e.g., identifying if that noise at night is a fox in the henhouse or just a cat, or finding where a colony of bats is entering a building by detecting their heat at the entry point.
Thermal vs Night Vision: What’s the Difference?
It’s worth briefly distinguishing thermal imaging from traditional night vision devices, as both are used for after-dark viewing. Night vision (such as image intensifier tubes or digital IR night vision) amplifies available light or uses infrared illuminators to create a visible image at night. Night vision is great for recognition (it often gives a more natural-looking image, so you can identify species by sight), but it requires some light or an IR beam and can be defeated by darkness or obstacles.
Thermal imaging, on the other hand, doesn’t use any light – it detects heat signatures, as we’ve discussed. This means thermal can see in absolute darkness and through light cover like grass or fog, which night vision cannot do. The trade-off is that thermal images are usually monochrome or false-colour and can sometimes lack fine detail (e.g., a person’s face is just a hot blob). Ideally, these technologies complement each other: many wildlife observers use thermal to detect and locate, then switch to binoculars or night vision to identify the species.
For pure detection capability, thermal wins hands-down – if it’s warm, you’ll see it. For identification at closer range, night vision can sometimes give a clearer picture (you might tell the difference between two similar bird species by plumage only with night vision or daylight optics, whereas thermals would just show both as similar heat shapes). In general, though, modern thermal cameras have such high resolution and sensitivity that you can often both detect and recognise common animals with one device, making them incredibly convenient.
Choosing the Right Thermal Imaging Camera for Wildlife
Thermal imaging cameras (spotters) come in a range of models, from budget-friendly units to advanced professional gear. Choosing the right one depends on your intended use, budget, and specific needs. Here are some key factors and features to consider, especially relevant to UK users:
- Detection Range & Sensor Resolution: Ask yourself how far you need to see. Entry-level thermal cameras might detect a human- or deer-sized heat source out to a few hundred metres (sufficient for backyard or woodland use), whereas high-end models can detect heat over a kilometre away. For example, a 256×192 resolution sensor might spot wildlife at a few hundred metres, whereas a 640×480 or larger sensor with a big lens can push detection beyond 1000m. In open areas like the Scottish Highlands, a long detection range is valuable for scanning vast hillsides. In a small wood or farm, 300m might be plenty. Higher sensor resolution not only increases range but also gives a more detailed image, which helps in identifying what you’re looking at. The latest top-tier devices even have HD sensors (e.g. ~1024×768 pixels) for exceptional detail at range. Keep in mind that detection isn’t the same as recognition – you might detect a heat signature far away, but to identify it as a fox vs. a cat, you’ll need enough resolution and optical magnification.
- Optics (Lens Size) & Field of View: The lens focal length (measured in mm) influences magnification and field of view (FOV). A larger lens (say 35mm or 50mm) will generally provide higher base magnification and longer range – great for open-country stalking or long-distance observation – but will have a narrower FOV. A smaller lens (say 6mm or 15mm) gives a wide view, which is better for scanning broad areas up close (for instance, monitoring a woodland patch or a garden). Wide FOV is nice for casual use and spotting animals quickly, while narrow FOV is better if you specifically need to observe at long range. In the UK, if you’re mostly in forests or your own property, a wide view (e.g. 24° or more) is handy. If you’re on the hill looking for deer, a narrower view with more reach is preferable. Consider also if the focus is fixed or adjustable – adjustable focus can sharpen images at various distances (useful for clarity), but fixed focus is simpler and usually fine for broad observations within a certain range.
- Size and Weight: Since you may carry it on hikes or in the field, the device’s weight matters. Most handheld thermal monoculars are quite compact (often between 250g to 600g). Compact models (some even pocket-sized) are convenient for long treks or for photographers to slip into a camera bag. Larger units might have more features or power but could be bulkier. Think about whether you need something that fits in a jacket pocket or if you don’t mind a larger gadget around your neck.
- Battery Life: There’s nothing worse than your tech dying in the middle of a night-time stakeout. Battery life in thermal cameras can range from around 4-5 hours on some high-performance units to 8+ hours on others (and some offer external battery packs or removable batteries for extended use). For example, a device might run ~7 hours on a charge, but you can carry a spare battery to swap in 10 seconds. If you plan on all-night wildlife watches or multi-day trips, opt for models known for good battery stamina or ones that allow quick battery changes. Also note charging options – many modern units charge via USB-C which is handy with power banks.
- Display and Eyepiece: The comfort and clarity of the display (where you view the thermal image) is important. Look for devices with high-resolution displays (some newer ones have HD displays for a sharp image). Also, an adjustable diopter is useful if you wear glasses or want to fine-tune focus for your eyesight. Some find larger eyepieces or even dual-eyepiece (binocular style) more comfortable for long viewing sessions, but monoculars are more common and generally fine.
- Durability and Weather Resistance: UK weather can be wet – ensure the thermal imager is at least IP66 or IP67 rated (meaning splashproof or fully waterproof). Many quality thermal cameras are designed to be rugged, with magnesium alloy or tough polymer bodies, to handle outdoor knocks and drops. Check the operating temperature range too; a good unit will work from deep winter cold (e.g. –20°C or lower) up to hot summer days without issues. If you’ll be out in rain or accidentally submerge the device, a higher waterproof rating (like IP67) is advisable.
- Extra Features: Consider what additional features might be useful for you:
- Recording & Connectivity: Do you want to record what you see or live-stream it? Many thermal cameras have built-in video/photo recording (often with internal memory ranging from 16GB to 64GB). They may also connect via Wi-Fi to a smartphone app, so you can share the view or save footage directly. This is great for documenting wildlife encounters or for a group watching together (some devices even allow multiple people to live-view on their phones simultaneously).
- Multiple Colour Palettes: Nearly all models offer different colour modes (white hot, black hot, etc.). This is pretty standard, but some offer more than others (8 or more palettes) which can help in different situations (for example, “red hot” can be easier on the eyes at night, and “black hot” sometimes gives better contrast for certain environments).
- Laser Rangefinder (LRF): A built-in rangefinder can tell you the exact distance to an animal with a laser. This is extremely useful for hunters or researchers gauging distance, but it typically comes in premium models (and adds cost). If you need to know if that deer is 200m or 400m away, an LRF model will give you that reading (often up to 800m or more range) with ~±1m accuracy. Some Pulsar Telos models, for instance, come in versions with or without LRF to suit user preference. Keep in mind an LRF may slightly increase the device’s weight and size.
- Upgradeable or Modular Design: Uncommon but noteworthy – a few high-end thermal devices (like Pulsar’s Telos series) are upgradeable, meaning certain components (sensor, lens, etc.) might be swapped or upgraded in future without buying a whole new device. This could be a consideration if you’re investing a lot and want future-proofing.
- Image Quality Features: High-end units might have proprietary image enhancement (for example, Pulsar’s “Image Boost” algorithms to improve detail) or even digital image stabilisation to reduce hand shake blurring. These can all contribute to clearer and more comfortable viewing, especially at long range.
- Recording & Connectivity: Do you want to record what you see or live-stream it? Many thermal cameras have built-in video/photo recording (often with internal memory ranging from 16GB to 64GB). They may also connect via Wi-Fi to a smartphone app, so you can share the view or save footage directly. This is great for documenting wildlife encounters or for a group watching together (some devices even allow multiple people to live-view on their phones simultaneously).
Finally, always consider your user type. If you’re a casual nature lover, you might prioritise a wide view and ease of use, and you might not need extreme range or the fanciest features – a mid-range compact thermal viewer could be perfect for watching wildlife in the local woods or on holiday. If you’re a hunter, you’ll value detection range, durability, and perhaps an LRF for distance – investing in a robust model with higher magnification could pay off.
A wildlife photographer might want a lightweight unit with great battery life and maybe recording to capture phenomena at night. A researcher or conservationist may prioritise sensitivity and detail to observe animal behaviour, as well as recording and maybe dual-battery setups for long hours. There’s a thermal camera out there for everyone; let’s look at some concrete examples next.
Comparison of Top Thermal Spotters (Monoculars) for Wildlife
Below is a comparison of ten of our popular thermal imaging camera models, from entry-level to high-end, highlighting key specifications and the type of user they’re best suited for:
| Thermal Spotter Model (and link) | Sensor & Lens (Resolution & Focal Length) | Detection Range(Human/Deer) | Key Features | Ideal For |
|---|---|---|---|---|
| Pixfra Mile 2 M207 | 256×192 sensor, 12µm7 mm f/1.0 lens | ~350 m | 50 Hz refresh; 1.1× base magnification (up to 8× digital); 800×600 OLED display; Wi-Fi & video recording; ~9.5 hr battery | Beginners & Hobbyists – Short-range spotting, casual wildlife watching (garden, woodland) on a budget. Light and easy to use. |
| Pulsar Axion XQ30 Pro | 384×288 sensor, 17µm30 mm f/1.2 lens | ~1050 m | 50 Hz; 2.0× base magnification (8× digital zoom); 13.3° wide field of view; 640×400 AMOLED display; records video (with audio); replaceable battery (~8 hr); IPX7 waterproof (submersible) | General Purpose Users – Mid-range performance for nature observation and pest control. Great balance of range and FOV in a compact, rugged package. Good for farm owners or hikers. |
| Pixfra Arc A613 | 640×512 sensor, 12µm13 mm f/1.0 lens | ~670 m | High sensitivity (<30 mK NETD); full-colour 1440×1080 OLED display; 1.0× base mag (4× digi zoom); dual batteries (~2×6.5 hr) for ~13 hr use; Wi-Fi app allows screen sharing to 4 devices; lightweight (~350 g) and IP67 durable | Enthusiasts & Groups – High-resolution viewing with superb image detail. Ideal for wildlife groups or birders (share view feature) and longer outings. A cost-effective 640× device. |
| Pulsar Axion Compact XG30 | 640×480 sensor, 12µm30 mm f/1.2 lens | ~1300 m | 50 Hz; 2.0× base mag (up to 16× digital); 14.6° field of view (wide for 640 sensor); 1024×768 AMOLED display (implied by XG series); removable APS3 battery (~7 hr); IPX7 magnesium alloy body; 8 colour palettes | Serious Hobbyists & Hunters – Pocket-sized powerhouse for those needing long detection in a small unit. Great for stalking and travel, with high detail for identification. |
| Pulsar Telos XQ35 (LRF/non-LRF) | 384×288 sensor, 17µm35 mm f/1.0 lens | ~1300 m | Fully upgradeable design; 3.0× base mag (12× max zoom); optional LRF (to 1000 m); Image Boost tech for clarity; large 640×480 display; robust build, ergonomic focus & mag rings; removable battery | Hunters & Tech-Savvy Users – Long-range, future-proof device. Perfect for those who want reliability and the option to upgrade or add rangefinder. Suited to UK deer stalking and vermin control in any weather. |
| Pulsar Axion Compact XG35 | 640×480 sensor, 12µm35 mm f/1.0 lens | ~1750 m | 2.5× base mag (up to 20× digital); 12.5° field of view; similar features to XG30 but with larger lens – greater zoom and reach; APS3 battery (~7 hr); IPX7 waterproof; compact design | Long-Distance Spotters – Those who need even more reach in a compact form. Suitable for open-field hunting and search roles, where detecting heat at extreme distances matters. |
| Pulsar Oryx LRF XG35 | 640×480 sensor, 12µm35 mm f/1.0 lens | ~1800 m | Ultra-sensitive (<20 mK NETD) for high detail; 2.5× base mag (20× digital); 12.5° FOV; Laser Rangefinder built-in (to 1500 m); dual battery system (internal + APS5, ~12 hr); 64 GB internal memory; digital image stabilisation for steady view; haptic feedback buttons | Professional & Conservation – High-end compact with rangefinder. Ideal for wildlife surveys, law enforcement, or the serious user who needs top sensitivity, long battery life, and precise ranging (e.g., identifying and measuring distances to animals for research or anti-poaching). |
| Pulsar Telos XG50 (LRF/non-LRF) | 640×480 sensor, 12µm50 mm f/1.0 lens | ~2300 m | 3.5× base mag (14× digital); large 50mm aperture for extreme range; optional LRF (to 1000 m); upgradeable device (Telos series); Image Boost tech; ergonomic focus & zoom rings; very long detection even in bad weather (rain, fog); swappable battery | Long-Range Experts – Those needing maximum range in a handheld. Suited for open landscapes (e.g., hill farmers, deer managers, search-and-rescue teams). This is a top performer for spotting heat signatures at extreme distances. |
| Pulsar Telos XP50 (LRF/non-LRF) | 640×480 sensor, 17µm50 mm f/1.0 lens | ~1800 m | Extra-low noise sensor (<18 mK NETD) for superb image clarity; 2.5× base mag (10× digital – wider view than XG50); optional LRF; extremely high thermal sensitivity shows tiny temperature differences (great for observing animal subtle behavior or in high humidity); customisable UI and controls; durable build | Image Clarity Aficionados – Professionals who prioritize image quality and contrast over sheer distance. Excellent for detailed observations (e.g., biologists studying animal movement). Still offers long range, but shines in providing a crisper thermal picture with minimal noise. |
| Pulsar Telos LRF XL50 | 1024×768 sensor, 12µm50 mm f/1.0 lens | ~2300 m | Cutting-edge HD sensor (1024px) for high resolution imaging; 2.5× base mag (20× digital, smooth zoom); integrated LRF (to 1000 m); 1024×768 AMOLED HD display; 64 GB memory; upgradeable Telos design; the clearest image with both long range and fine detail. Pricey but unmatched performance. | High-End Professional – The ultimate thermal spotter for wildlife. Ideal for conservation leaders, research organisations, or the most demanding enthusiasts who want the best available tech (e.g., monitoring endangered wildlife or large-area surveillance). |
Notes: Detection ranges above are approximate for man-size or deer-size targets. Real-world performance can vary with weather and environment. All these devices support multiple colour palettes and basic features like adjustable focus (if not fixed), diopter adjustment, etc. Links go to the official product pages for more detailed specs.
As shown, there’s a thermal imaging solution for every need – from the budget Pixfra M207 for casual use to the advanced Pulsar Telos and Oryx units for professional applications. Importantly, even the lower-cost models will detect heat and let you see animals in darkness, which is the core function most people want. More expensive models refine that capability (greater distance, clearer images, added features like range finding or recording). When choosing, focus on what distance and detail you truly require and how you’ll use the device.
Tips for Using Thermal Cameras for Wildlife
Once you have your thermal imager, here are a few tips to get the best out of it in the field:
- Give Your Eyes Time: Using a thermal monocular, especially at night, can take a bit of getting used to. It’s a different visual experience. Spend time scanning slowly and train yourself to recognise animal shapes in thermal (for example, a rabbit might appear as a small oval hot spot with cooler ears, whereas a fox will have a distinct elongated shape with a hotter core). After some practice, you’ll quickly differentiate species by their thermal profile and movement.
- Use Appropriate Colour Modes: Most people use “white hot” (hotter = white) or “black hot” (hotter = black) as default. White hot is very intuitive, but black hot can sometimes improve contrast in certain environments (like on cold days, animals stand out as dark figures against a light background). Red monochrome or low brightness modes are useful at night to preserve your own night vision (and are easier on the eyes). Try cycling through palettes to see which gives the best view for your situation.
- Mind the Background Heat: Remember that some non-animal objects can be warm too – sunlight heating a rock or a recently driven vehicle in the distance will also show a heat signature. In the cooler UK climate this is less of an issue than in hot countries, but on a sunny afternoon rocks and walls hold heat and will appear bright well into the night. Don’t confuse a warm rock for an animal – usually animals move or have distinct shapes, but be aware of “false positives.” Likewise, water bodies often appear cold (dark) but an animal swimming in water will still show warmth (though damp fur can reduce its thermal visibility a bit).
- Respect Wildlife: Thermal cameras make it easier to find animals – sometimes too easy, which could tempt one to get closer than one should. Always use your new capability ethically. Avoid stressing animals; just because you can see that sleeping deer in the dark doesn’t mean you should approach and startle it. For protected species, keep the usual distances. Thermal imagers should be a tool for appreciation and conservation, not harassment. The non-intrusive benefit only holds if you remain non-intrusive in person too.
- Know the Law: As mentioned, in the UK it’s legal to own and use thermal cameras for observation. But if you’re using them in conjunction with any hunting or pest control at night, ensure you’re compliant with hunting regulations and have permission on the land. Also, if traveling abroad with your thermal imager, be aware that some countries regulate thermal/night vision devices (export licenses, etc.).
- Integration with Other Gear: Consider pairing your thermal spotter with other tools. For instance, once you locate an animal with thermal, you might switch to regular binoculars (if there’s enough light or you have a spotlight) to identify species or enjoy a natural view. Or you may use the thermal in tandem with a trail camera – e.g., find where animals are active and then set up a trail camera there. Also, carry spare batteries or a power bank if you’re out long – you don’t want to lose thermal capability halfway through a night hike.
Conclusion
Thermal imaging cameras have opened up a new frontier in wildlife observation. They empower anyone – from a weekend birder in the Yorkshire Dales to a professional ecologist in the Cairngorms – to observe wildlife in ways that simply weren’t possible before. By detecting the heat of animals, these cameras let us find nocturnal and hidden creatures, monitor them ethically from a distance, and even aid in conservation and safety efforts. In the UK’s diverse environments (be it woodlands, hills, or your own back garden), a thermal imaging camera for wildlife can be an invaluable companion, enhancing your situational awareness and appreciation for nature.
As we’ve discussed, there are many models available, each with its strengths. When optimising your choice, think about how far you need to see, how clear an image you want, and what features will be most useful for your activities. A balance of performance and budget can be struck once you identify whether you’re a casual observer or a user with specialist requirements. The comparison table above should guide you in understanding the spectrum from basic to cutting-edge. Ultimately, owning a thermal imager is like having a magic torch that reveals the wild lives happening all around us after dark.
It’s a thrill the first time you spot that ghostly white shape of a creature moving in total darkness and realise it’s a fox sneaking across your field, or see the warm cluster of a bird’s nest high in a tree on a cold morning. These cameras provide not just utility but a sense of wonder, turning the night (or dense cover) into a stage where wildlife becomes visible. Used responsibly, a thermal imaging camera will undoubtedly enrich your outdoor adventures across the UK.